k8s学习(27):部署Helm

https://github.com/helm/helm/blob/master/docs/charts.md

什么是Helm

在没使用Helm之前,向kubernetes部署应用,我们要依次部署deployment、svc等,步骤较繁琐,况且随着很多项目微服务化,复杂的应用在容器中部署以及管理显得较为复杂,helm通过打包的方式,支持发布的版本管理和控制,很大程度上简化了kubernetes应用的部署和管理

Helm本质就是让k8s的应用管理(deployment,service等)可配置,能动态生成。通过动态生成k8s清单文件(deploy.yaml,svc.yaml)。然后调用kubectl自动执行k8s资源部署

Helm是官方提供的类似于YUM的包管理器,是部署环境的流程封装。Helm有两个重要的概念:chart和release

  • chart是创建一个应用的信息集合,包括各种kubernetes对象的配置模板、参数定义、依赖关系、文档说明等。chart是应用部署的自包含逻辑单元。可以将chart想象成apt、yum中的软件安装包
  • release是chart的运行实例,代表了一个正在运行的应用。当chart被安装到kubernetes集群,就生成一个release。chart能够多次安装到同一个集群,每次安装都是一个release

Helm包含两个组件:Helm客户端和Tiller服务器,如下图所示

image-20200205181419004

Helm客户端负责chart和release的创建和管理以及和TIller的交互

Tiller服务器运行在kubernetes集群中,它会处理Helm客户端的请求,与kubernetes API Server交互

Helm部署

越来越多的公司和团队开始使用Helm这个kubernetes的包管理器,我们也将使用Helm安装kubernetes的常用组件。Helm由客户端helm命令行工具和服务端tiller组成,Helm的安装十分简单。下载helm命令行工具到master节点node1的/usr/local/bin下,这里下载的2.13.1版本:

1
2
3
4
5
6
ntpdate ntp1.aliyun.com
## k8s1.15版本用的2.13.1没问题,k8s1.17版本用2.13报错,用2.16不报错
wget https://storage.googleapis.com/kubernetes-helm/helm-v2.13.1-linux-amd64.tar.gz
tar -zxvf helm-v2.13.1-amd64.tar.gz
cd linux-amd64
cp helm /usr/local/bin/

为了安装服务端tiller,还需要在这台机器上配置好kubectl工具和kubeconfig文件,确保kubectl工具可以在这台机器上访问apiserver且正常使用。这里的node1节点以及配置好了kubectl

因为kubernetes APIServer开启了RBAC访问控制,所以需要创建tiller使用的serviceaccount:tiller并分配合适的角色给它。详细内容可以查看helm文档中的Role-based Access Control。这里简单起见直接分配cluster-admin这个集群内置的ClusterRole给它。创建rbac-config.yaml文件:

1
2
3
4
5
6
7
8
9
10
11
12
13
14
15
16
17
18
apiVersion: v1
kind: ServiceAccount
metadata:
name: tiller
namespace: kube-system
---
apiVersion: rbac.authorization.k8s.io/v1beta1
kind: ClusterRoleBinding
metadata:
name: tiller
roleRef:
apiGroup: rbac.authorization.k8s.io
kind: ClusterRole
name: cluster-admin
subjects:
- kind: ServiceAccount
name: tiller
namespace: kube-system
1
2
3
[root@k8s-master helm]# kubectl create-f rbac-config.yaml
serviceaccount/tiller created
clusterrolebinding.rbac.authorization.k8s.io/tiller created
1
2
3
## 或者直接使用命令行创建rbac
kubectl -n kube-system create serviceaccount tiller
kubectl create clusterrolebinding tiller --clusterrole cluster-admin --serviceaccount=kube-system:tiller
1
2
3
4
5
6
7
8
9
10
11
12
13
14
15
16
17
18
19
20
[root@k8s-master helm]# helm init --service-account tiller --skip-refresh
Creating /root/.helm
Creating /root/.helm/repository
Creating /root/.helm/repository/cache
Creating /root/.helm/repository/local
Creating /root/.helm/plugins
Creating /root/.helm/starters
Creating /root/.helm/cache/archive
Creating /root/.helm/repository/repositories.yaml
Adding stable repo with URL: https://kubernetes-charts.storage.googleapis.com
Adding local repo with URL: http://127.0.0.1:8879/charts
$HELM_HOME has been configured at /root/.helm.

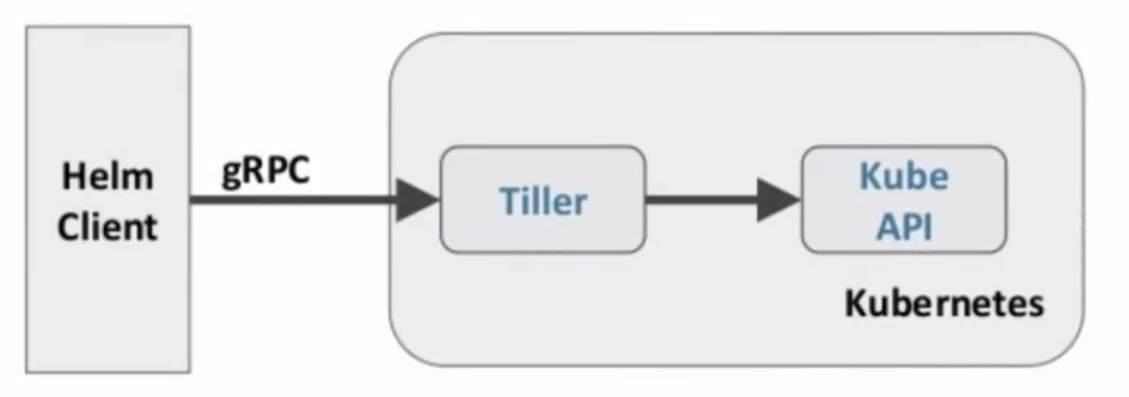
Tiller (the Helm server-side component) has been installed into your Kubernetes Cluster.

Please note: by default, Tiller is deployed with an insecure 'allow unauthenticated users' policy.
To prevent this, run `helm init` with the --tiller-tls-verify flag.
For more information on securing your installation see: https://docs.helm.sh/using_helm/#securing-your-helm-installation
Happy Helming!

1
2
3
4
5
6
7
8
9
10
11
12
13
14
15
16
17
18
19
20
21
22
23
24
25
26
[root@k8s-master helm]# kubectl get pods -n kube-system -l app=helm
NAME READY STATUS RESTARTS AGE
tiller-deploy-58565b5464-57xjr 0/1 ImagePullBackOff 0 72s

## 镜像下载失败,查看是哪个镜像
[root@k8s-master helm]# kubectl describe pod tiller-deploy-58565b5464-57xjr -n kube-system
...
...省略
...
Normal BackOff 72s (x6 over 3m37s) kubelet, k8s-node02 Back-off pulling image "gcr.io/kubernetes-helm/tiller:v2.13.1"
Warning Failed 61s (x7 over 3m37s) kubelet, k8s-node02 Error: ImagePullBackOff

## 下载阿里docker镜像,参考https://www.jianshu.com/p/423a2b19272a
[root@k8s-node02 test]# docker pull registry.cn-hangzhou.aliyuncs.com/google_containers/tiller:v2.13.1
v2.13.1: Pulling from google_containers/tiller
5d20c808ce19: Pull complete
43339c468bb6: Pull complete
d6d696e230df: Pull complete
9cf2c942cf64: Pull complete
Digest: sha256:d52b34a9f9aeec1cf74155ca51fcbb5d872a705914565c782be4531790a4ee0e
Status: Downloaded newer image for registry.cn-hangzhou.aliyuncs.com/google_containers/tiller:v2.13.1
registry.cn-hangzhou.aliyuncs.com/google_containers/tiller:v2.13.1


## 修改tag
docker tag registry.cn-hangzhou.aliyuncs.com/google_containers/tiller:v2.13.1 gcr.io/kubernetes-helm/tiller:v2.13.1
1
2
3
[root@k8s-master helm]# helm version
Client: &version.Version{SemVer:"v2.13.1", GitCommit:"618447cbf203d147601b4b9bd7f8c37a5d39fbb4", GitTreeState:"clean"}
Server: &version.Version{SemVer:"v2.13.1", GitCommit:"618447cbf203d147601b4b9bd7f8c37a5d39fbb4", GitTreeState:"clean"}

tiller默认被部署在k8s集群中的kube-system这个namespace下

Helm 自定义模板

Helm官网已经有为使用者打包好的模板,地址:https://hub.helm.sh/

也可以自己制作模板

1
2
3
# 创建文件夹
$ mkdir ./hello-world
$ cd /hello-world
1
2
3
4
5
# 创建自描述文件 Chart.yaml,这个文件必须有name和version定义
$ cat << EOF > ./Chart.yaml
name: hello-world
version: 1.0.0
EOF
1
2
3
4
5
6
7
8
9
10
11
12
13
14
15
16
17
18
19
20
21
22
23
24
25
26
27
28
29
30
31
32
33
34
# 创建模板文件,用于生成kubernetes资源清单(manifests)
$ mkdir ./templates
$ cat << EOF > ./templates/deployment.yaml
apiVersion: extensions/v1beta1
kind: Deployment
metadata:
name: hello-world
spec:
replicas: 1
template:
metadata:
labels:
app: hello-world
spec:
containers:
- name: hello-world
image: hub.test.com/library/myapp:v1
ports:
- containerPort: 80
protocol: TCP
EOF
$ cat << EOF > ./templates/service.yaml
apiVersion: v1
kind: Service
metadata:
name: hello-world
spec:
selector:
app: hello-world
ports:
- port: 80
targetPort: 80
protocol: TCP
type: NodePort

这里可以有很多个yaml,全部都会执行

1
2
3
4
5
6
7
8
9
10
11
12
13
14
15
16
17
18
19
20
# 使用命令 helm install RELATIVE_PATH_TO_CHART 创建一次Release
[root@k8s-master hello-world]# helm install .
NAME: hoping-alpaca
LAST DEPLOYED: Thu Feb 6 01:00:06 2020
NAMESPACE: default
STATUS: DEPLOYED

RESOURCES:
==> v1/Pod(related)
NAME READY STATUS RESTARTS AGE
hello-world-f75c8749b-kg78f 0/1 ContainerCreating 0 0s
hello-world-f75c8749b-vhgjc 0/1 ContainerCreating 0 0s

==> v1/Service
NAME TYPE CLUSTER-IP EXTERNAL-IP PORT(S) AGE
hello-world NodePort 10.106.106.148 <none> 80:32202/TCP 0s

==> v1beta1/Deployment
NAME READY UP-TO-DATE AVAILABLE AGE
hello-world 0/2 0 0 0s
1
2
3
4
5
6
7
8
9
10
11
12
13
14
15
16
17
18
19
20
21
22
23
24
25
26
27
28
29
30
31
32
33
34
35
36
37
# 列出已经部署的Release
[root@k8s-master hello-world]# helm ls
NAME REVISION UPDATED STATUS CHART APP VERSION NAMESPACE
hoping-alpaca 1 Thu Feb 6 01:00:06 2020 DEPLOYED hello-world-1.0.0 default

# 查询一个特定的Release的状态
[root@k8s-master hello-world]# helm status hoping-alpaca
LAST DEPLOYED: Thu Feb 6 01:00:06 2020
NAMESPACE: default
STATUS: DEPLOYED

RESOURCES:
==> v1/Pod(related)
NAME READY STATUS RESTARTS AGE
hello-world-f75c8749b-kg78f 1/1 Running 0 50s
hello-world-f75c8749b-vhgjc 1/1 Running 0 50s

==> v1/Service
NAME TYPE CLUSTER-IP EXTERNAL-IP PORT(S) AGE
hello-world NodePort 10.106.106.148 <none> 80:32202/TCP 50s

==> v1beta1/Deployment
NAME READY UP-TO-DATE AVAILABLE AGE
hello-world 2/2 2 2 50s

# 移除所有与这个Release相关的kubernetes资源
$ helm delete hoping-alpaca

# helm rollback RELEASE_NAME REVISION_NUMBER
$ helm rollback hoping-alpaca 1

# 使用helm delete --purge RELEASE_NAME 移除所有指定Release相关的kubernetes资源和所有这个Release的记录
$ helm delete --purge hoping-alpaca
$ helm ls --deleted

# 修改了yaml,更新此应用
helm upgrade hoping-alpaca .

知识点:

1 可以将关键点做成values

2 删除helm不会真的删除,(可通过helm list --deleted查看),无法再创建同名helm,后期可以rollback

3 真正删除需要加–purge

可修改的helm

1
2
3
4
5
6
7
8
9
10
11
12
13
14
15
16
17
18
19
20
21
22
23
24
25
26
27
28
29
30
31
32
33
# 配置体现在配置文件 values.yaml
$ cat << EOF > ./values.yaml
image:
repository: gcr.io/google-samples/node-hello
tag: '1.0'
EOF

# 这个文件中定义的值,在模板文件中可以通过 .Values对象访问到
$ cat << EOF > ./templates/deployment.yaml
apiVersion: extensions/v1beta1
kind: Deployment
metadata:
name: hello-world
spec:
replicas: 1
template:
metadata:
labels:
app: hello-world
spec:
containers:
- name: hello-world
image: {{ .Values.image.repository }}:{{ .Values.image.tag}}
ports:
- containerPort: 80
protocol: TCP
EOF

# 在values.yaml中的值可以被部署release时用到的参数 --values YAML_FILE_PATH 或 --set key1=value1, key2=value2覆盖掉
$ helm install --set image.tag='latest' .

$ 升级版本
helm upgrade [-f values.yaml] test .

Debug

1
2
3
# 使用模板动态生成k8s资源清单,非常需要能提前预览生成的结果
# 使用--dry-run --debug选项来打印出生成的清单文件内容,而不执行部署
helm install . --dry-run --debug --set image.tag=latest